

Best Way to Haul Moose Meat: A Step-by-Step Guide
Last Updated: October 23, 2026
Quick Summary
The best way to haul moose meat is to quarter the animal first, cutting it into four leg sections plus the neck and trim so each piece is light enough for one person to move. Then get quarters off the ground, into game bags, and cooling in shade fast, choosing your haul method based on terrain, distance, weather, and equipment.
- Quartering a moose means cutting it into four leg sections plus the neck and trim.
- Get the animal broken down and meat into bags within the first 30 to 60 minutes.
- Move meat toward a cooler or cold storage within 8 to 12 hours of the shot.
- A UTV game hauling attachment should be receiver-hitch mounted and rated for one-person operation.
- Freeze meat solid before a flight when possible, and label the box clearly as game meat.
Table of Contents
- How to Quarter a Moose for a Cleaner, Faster Haul
- Moose Meat Cooling Techniques That Protect Quality
- Choosing Your Haul Method: Terrain, Distance, Weather, and Equipment
- UTV Game Hauling Attachments: What to Look For
- Packing Moose Meat Out by Hand or Boat
- Transport Rules and Airline Requirements for Moose meat
- Weight, Distance, and Trip-Planning Calculations
- Frequently Asked Questions
How to Quarter a Moose for a Cleaner, Faster Haul
The best way to haul moose meat starts long before you touch a UTV or a pack frame. It begins with how you break the animal down. Get the quartering right, and every subsequent step becomes easier.
Here's the essential breakdown: quartering a moose means cutting the animal into four leg sections plus the neck and trim, so each piece is light enough for one person to move. A whole moose is far too heavy to shift in one piece. Quarters are the practical unit of work.
Field Dressing and Breaking the Animal Down
Start with the gutless method if you're working alone. This approach bypasses a full field dress and expedites meat cooling.
Work in this order:
- Skin one side from the spine down to the belly line.
- Cut the front quarter free at the shoulder, following the natural seam.
- Remove the hindquarter at the hip joint. Locate the seam with your knife; avoid sawing through bone.
- Roll the animal and repeat on the other side.
- Take the neck and trim last.
- Leave the hide, head, and antlers for the trophy pack if you intend to keep them.
A common error is cutting too close to the bone, leaving valuable meat behind. Always follow the natural seams; the meat will often separate with minimal effort once you find the correct line.
Keeping Meat Clean During Retrieval
Clean meat cools faster and tastes better. This is the ultimate goal of a successful retrieval.
- Get it off the ground immediately. Lay quarters on a tarp, game bags, or clean branches.
- Bag it fast. Slide each quarter into a meat bag and tie it off securely.
- Keep hair off the meat. Wipe or clean your knife between cuts.
Dirt and hair are the two contaminants that cannot be washed out later. Once they penetrate the meat's surface, they remain.
Moose Meat Cooling Techniques That Protect Quality
Cooling is a critical phase where good retrievals are either made or lost. Moose meat is dense, and a large quarter retains heat for hours. Your primary objective is to facilitate air circulation around it and reduce the meat's temperature as rapidly as possible.
Hang quarters in the shade with adequate space between them. If you are using game bags, keep them loose rather than wrapped tightly. Airflow is far more effective than insulation in the field.
Cooling and Food-Safety Timelines
Treat these timelines as your operational targets. They are intentionally conservative, and warm weather will compress every window.
- First 30-60 minutes: Get the animal broken down and the meat into bags. Body heat is the primary enemy; the clock starts ticking from the moment of the shot.
- First 2-4 hours: Place quarters in deep shade, off the ground, with air moving on all sides. Prop quarters apart with clean sticks if necessary.
- Same day (within 8-12 hours): Move meat toward a cooler, cold storage, or a shaded hanging spot where night temperatures are near or below 4°C (39°F).
A frequent oversight in the field is underestimating how long a hindquarter retains heat. A dense moose hindquarter can hold internal heat for several hours, even in shaded conditions. If you cannot get the meat's internal temperature below approximately 7°C (45°F) within the first day, prioritize getting it to a cooler or processor without delay.
Spoilage Warning Signs
Familiarize yourself with the visual and tactile indicators of spoilage before investing further effort in hauling the meat.
- Smell: Any sour, ammonia-like, or putrid odor is an immediate red flag. Fresh moose meat possesses a mild, clean scent.
- Texture: Meat that feels slimy or tacky to the touch, as opposed to dry and firm, is suspect.
- Color: Grayish or greenish patches, particularly near the bone or in folds, indicate spoilage. Fresh meat typically has a dark red to purplish hue.
When in doubt, always err on the side of caution. No retrieval is worth the risk of foodborne illness.
Choosing Your Haul Method: Terrain, Distance, Weather, and Equipment
There is no universally correct answer for this. The optimal haul method is contingent upon four key factors: terrain, distance, weather, and the specific equipment you have available.
Use this decision-making guide:
| Situation | Best Haul Method | Why |
|---|---|---|
| Flat ground, short distance, cool weather | Hand pack or drag | Fast, no setup required |
| Rough terrain, long distance, UTV access | UTV with a hauling attachment | Reduces physical strain, moves weight efficiently |
| Water access near the kill | Boat | Capable of carrying heavy loads with minimal effort |
| Steep bush, no vehicle access | Quarter and hand pack in stages | The only viable option in such conditions |
Match your method to the actual ground conditions, not to aspiration. A UTV that cannot safely reach the animal is ineffective. Similarly, a boat situated a kilometre from the shoreline offers no practical benefit.
UTV Game Hauling Attachments: What to Look For
A UTV often serves as the primary workhorse for remote retrievals, but a standard machine is not designed for loading a moose quarter by yourself. A purpose-built attachment addresses this challenge.
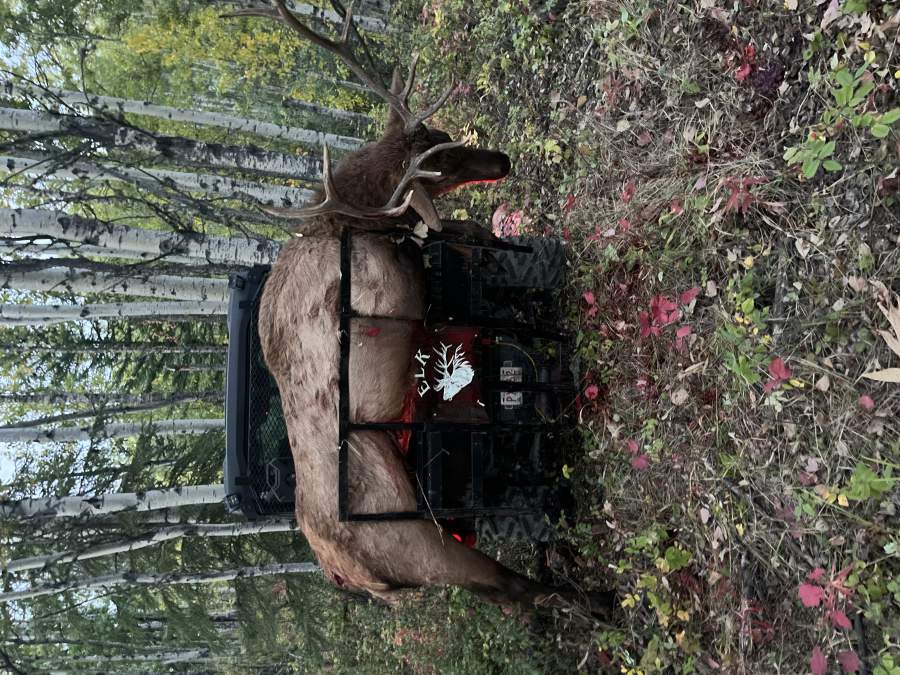
When evaluating UTV game hauling attachments, consider these specifications:
- Receiver-hitch mounting for compatibility with most utility UTVs.
- Load rating that meets or exceeds your anticipated hauling needs. Never exceed your UTV's rated capacity.
- One-person operation is crucial, as solo hunters cannot depend on assistance.
This is precisely the problem the Elk Hauler was engineered to solve. It is a receiver-hitch attachment designed to enable a single person to recover elk, moose, and deer using a utility UTV.
Loading and Securing Meat on a UTV
Loading is straightforward once the attachment is properly mounted. Securing the load is where many hunters become complacent.
- Insert the attachment into the receiver and secure it with the hitch pin.
- Connect the wiring if your unit requires electrical power.
- Load quarters one at a time, placing the heaviest pieces closest to the machine.
- Strap everything down securely. Duct tape and ratchet straps are essential tools.
- Perform a shake test before moving. If the load shifts when pushed by hand, it will certainly shift on the trail.
Packing Moose Meat Out by Hand or Boat
If vehicle access is not an option, you will be packing the meat out. This necessitates careful planning of loads based on weight and distance.
A solo hunter can realistically carry one front quarter per trip using a well-fitted pack frame. Hindquarters are heavier and may require splitting or boning out.
For a boat retrieval, the shoreline becomes your primary staging area. Maneuver the boat as close as safely possible, then ferry quarters to it in stages.
Transport Rules and Airline Requirements for Moose meat
Getting your meat home presents its own set of challenges. Regulations vary by carrier and destination, so it is imperative to confirm these details before flying. However, you can prepare to a common standard that satisfies most carriers and inspectors.
For commercial flights, most airlines classify frozen or properly chilled game meat as checked baggage. However, weight limitations, packaging rules, and documentation requirements differ among carriers. Always consult with your specific airline and the destination's wildlife authority prior to travel.
A Carrier-Agnostic Checklist
Use this as your baseline, then verify the specific requirements with your airline and destination authority.
- Packaging: Employ a leak-proof cooler or a heavy-duty meat box. Line it with absorbent pads or towels. Double-bag the meat in heavy plastic before placing it in the box.
- Temperature: Freeze meat solid before the flight whenever feasible. Frozen meat travels better, leaks less, and generally complies with checked baggage regulations more easily.
- Labeling: Clearly label the exterior as frozen/chilled game meat. Include your name and contact information.
Shipping Versus Flying
If you plan to ship meat rather than fly with it, the same packaging principles apply, but transit time becomes a more critical factor. Use insulated boxes with gel packs rated for the anticipated transit duration, and confirm the recipient's receiving regulations before shipping. A common approach is to ship frozen meat via overnight or two-day service to minimize the risk of thawing.
Weight, Distance, and Trip-Planning Calculations
Perform the necessary calculations before you depart. This proactive approach saves unnecessary trips and protects your physical well-being.
Estimate the load:
- A mature moose yields a substantial amount of boneless meat. Plan for multiple trips regardless of your chosen method.
- Per-person carry weight should remain conservative, particularly on challenging terrain.
- Distance per trip effectively doubles when you account for the return journey.
A straightforward planning rule: determine your total meat weight, divide it by what one person can safely carry per trip, and then add one additional trip for gear and the trophy. This provides your realistic trip count. Factor in extra time for potential weather delays and difficult terrain. If you are hauling with a UTV, verify your intended route on wood roads well in advance of the season, not on the morning of the retrieval.
Frequently Asked Questions
What is the most efficient way to quarter a moose for transport?
Skin and quarter the moose where it falls, working from the hindquarters forward. Remove the front quarters, then the hindquarters, then the backstraps and tenderloins. Keep each piece in a game bag and get it off the ground on a tarp or branches. Quartering on site cuts the weight per load to a manageable size and lets cooling start sooner, which matters more than speed on the drive out.
How do you keep moose meat cool during a long drive?
Get the meat off the ground and into game bags immediately, then move it to shade or open air so the surface dries. On the drive, pack quarters into coolers with ice or frozen jugs, and keep the drain open so meltwater does not pool against the meat. Aim to bring the meat below 4 C within a few hours of the kill. If the trip runs long, top up ice at the first opportunity.
Can you use a UTV for moose meat retrieval in remote areas?
Yes, provided the terrain suits the machine and you stay within its rated capacity. A receiver-hitch attachment such as the Elk Hauler mounts to most utility UTVs and handles 700+ lb or your UTV's rating, whichever is lower. Check your receiver compatibility and never exceed the machine's rating. Where the UTV cannot safely go, park it and pack quarters to it rather than pushing the machine past its limits.
What are the legal requirements for transporting game meat across provincial borders?
Rules vary by province and by species. Most provinces require evidence of sex and species to remain attached to the meat until it reaches your home or a licensed processor, and some require a completed transport permit or export tag. Check the regulations for the province where the animal was taken and for any province you pass through before you load the truck. Keep licences and tags with the meat.
Hauling a moose alone is physically demanding, and employing an inefficient method exacerbates the difficulty. If you hunt with a UTV, the Elk Hauler attachment is engineered to alleviate the strain of the pack-out, featuring one-person operation, a capacity exceeding 700 lb, and a 1-year warranty. Get started with Elk Hauler and bring your harvest out without the struggle.
